Probably the best tagline in the world
Menu
How many balloons for an arch? Want a simple answer? Get my free calculator now!
- Home
- Balloony FAQ
- Seeing the Balloon Column Pole
Seeing the Balloon Column Pole
by Gloria
(Birmingham)
Hi, I'm new to the balloon decor business and was wondering if you know why, each time I make a balloon column, I can see the pole through the gaps in the balloons.
I know how to wrap it to help disguise it but I can still see it. I've see lots of other columns made by others and can't see their poles, or is it the angle of which the photograph has been taken?
Hope you can help, it's been playing on my mind for a while now.
Gloria
Pro Secrets: How to Hide Balloon Column Poles Like an Expert
First of all, congratulations on starting your balloon decor business, Gloria. 👏
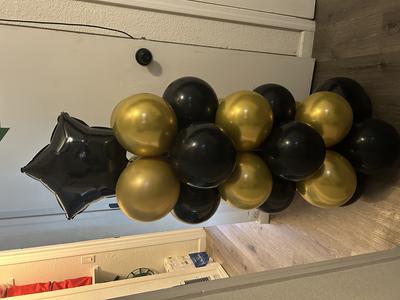
The issue you're experiencing with visible poles in balloon columns is a common challenge, especially for beginners (as you can see in the example image I uploaded).
Here are some tips to help you improve your technique:
Balloon sizing: The key to a professional-looking column is using uniformly sized balloons. Invest in a balloon sizer (also called a balloon measurement box) to ensure consistency. You can purchase one or make your own using a cardboard box with circular cut-outs. This tool will help you inflate balloons to the exact same size every time.
Check out my page about balloon sizers for more information. You'll even find a simple balloon sizing alternative using two chairs!
Proper inflation: For 11" balloons, try under-inflating them to about 8" or 9". This creates a fuller look and helps cover gaps.
Cluster creation: Create tight clusters of four balloons. The professional method is to tie both inflated balloons together with a single knot. To do this, lay one neck over the other and tightly wrap each neck around the other and secure with a half knot/over under tie. You'll find a video of this technique in my balloon column tutorial. This technique will take some practice but results in tighter clusters.
Positioning: When attaching clusters to the pole, make sure to position them tightly. Push the first cluster onto the pole until the pole is in contact with the knots in the middle of the cluster.
When you add the second cluster of balloons, rotate it clockwise for about half a balloon, so that the balloons of the second cluster fit snugly into the gaps between the balloons of the first cluster. Keep rotating each subsequent cluster in the same way.
If you're working with more than one color, this method will result in a beautiful spiral pattern.
Make the column pole disappear: If you're pressed for time, you could simply buy a color matching shower curtain rod cover.
However, a more flexible and professional looking method would be wrapping the column pole with 260Q balloons. Here's a step-by-step:
How to Use 260Q Balloons to Wrap Column Poles
1. Choose 260Q balloons in a color that matches your column design.
2. Inflate just a small part of the 260Q.
3. Place your balloon at the top of the pole.
4. Then rotate the pole, pressing the bubble against it firmly.
5. To add another balloon, deflate the first one, wrap it around the pole, overlay the next balloon and twist the pole in the opposite direction.
6. When you're done, deflate the balloon and tie a knot to fasten it.
Watch this 60 second video to follow the steps.
I hope these tips help, Gloria. Don't be discouraged if your first attempts aren't perfect. Keep refining your technique, and soon you'll be creating stunning, gap-free columns!
Comments for Seeing the Balloon Column Pole
|
||
|
||
|
||
|
||


